Nexus Repository
Nexus Repository
Description
As a developer something that is great to use is a binary repository for any binaries you create. It’s also great for distributing binaries or caching downloads. Docker containers may have a download rate limit but if you cache the containers you can download them straight from your mirror at the rate of your own network. Nexus is awesome because it allows you to have many different types of repositories. We will use it to make a docker mirror or make a pypi repo.
Setup
I will be using a VM with docker installed to host Nexus. On the Ubuntu VM you can start Nexus by using the following command.
docker run -d --net host --name nexus sonatype/nexus3
Login
To login to Nexus type the address of the computer running the container with the port 8081. For example I am using:
http://172.16.196.129:8081
The username will be admin. The password can be found in /nexus-data/admin.password in the container. A quick command to get the password is:
docker exec -it nexus cat /nexus-data/admin.password
Docker Repository Setup
Now that we ahve login access to this repository we need to start using it. The first kind of repository we will setup is a docker mirror. It will work like a cache for Docker hub so you can store your images locally from Docker Hub incase you need to redownload somewhere else. This would work incredibly well for kubernetes where you could have a local mirror pulling images instead of pulling from Docker Hub with bandwidth limits.
Setup on Nexus
First click on the gear in the upper left hand side of the screen.
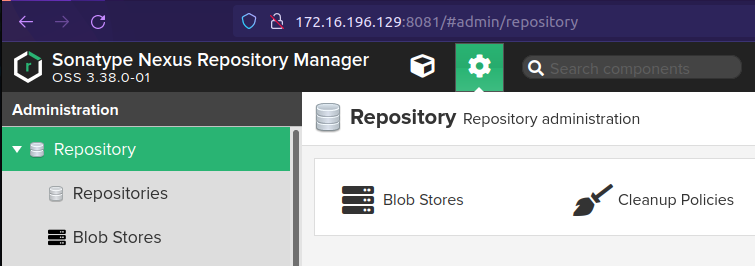
Then click repositories.
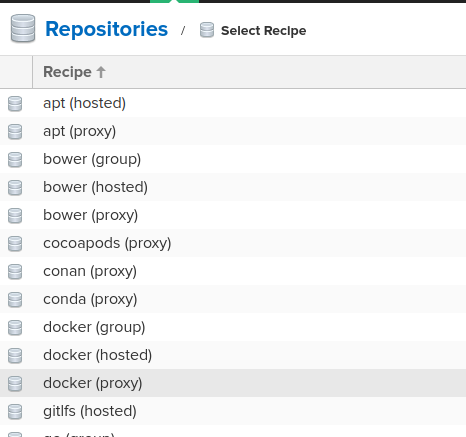
The type we want in docker proxy.

Under this next page we want to configure it with a unique name. I will call mine “docker-mirror-danstechjourney”. Then add in port 5000 under the HTTP section which will allow us to connect on that port. After this ensure the remote storage proxy is set to https://registry-1.docker.io.
Now click Create Repository.
Setup from Docker Client
Now we need to ensure our client will connect to our repo with normal http. Setting up https is outside of the scope of this tutorial. First thing is to edit /etc/docker/daemon.json. If the file does not exist create it and ensure the following is in the file:
{
    "insecure-registries": ["172.16.196.129:5000"]
}
Ensure to replace the IP address with the IP of your nexus repository.
Now login to the repo by using the docker login command.
docker login 172.16.196.129:5000
I use the admin username and password here and I am able to login perfectly fine. Now pull down an image but make sure to prepend 172.16.196.129:5000/ to the dockerhub image name. Ensure to use your repository’s IP address here.
dan@ubuntu:~$ sudo docker pull 172.16.196.129:5000/hello-world
Using default tag: latest
latest: Pulling from hello-world
2db29710123e: Pull complete
Digest: sha256:bfea6278a0a267fad2634554f4f0c6f31981eea41c553fdf5a83e95a41d40c38
Status: Downloaded newer image for 172.16.196.129:5000/hello-world:latest
172.16.196.129:5000/hello-world:latest
Now that image is cached! We can delete it and repull the image and it will pull directly from our repository. Let’s try that with a bigger image to test this theory. Pull down the centos image.
xadlien@swift3x:~$ time sudo docker pull 172.16.196.129:5000/redis
Using default tag: latest
latest: Pulling from redis
c229119241af: Pull complete
bed41eb8190a: Pull complete
5e59eaa723f1: Pull complete
fd5ad7669819: Pull complete
566c064eef6e: Pull complete
20c7cfac25de: Pull complete
Digest: sha256:69a3ab2516b560690e37197b71bc61ba245aafe4525ebdece1d8a0bc5669e3e2
Status: Downloaded newer image for 172.16.196.129:5000/redis:latest
172.16.196.129:5000/redis:latest

real	0m12.361s
user	0m0.028s
sys	0m0.023s
xadlien@swift3x:~$ sudo docker rmi 172.16.196.129:5000/redis:latest
Untagged: 172.16.196.129:5000/redis:latest
Untagged: 172.16.196.129:5000/redis@sha256:69a3ab2516b560690e37197b71bc61ba245aafe4525ebdece1d8a0bc5669e3e2
Deleted: sha256:bba24acba395b778d9522a1adf5f0d6bba3e6094b2d298e71ab08828b880a01b
Deleted: sha256:5726155c2814185f5631426213a942b614f72d0ded9d4ea753dff176d1efd898
Deleted: sha256:26ce1897b2aafe8c91ac8462a9652bae89fa5c9481102e4d922fb091a8b57bba
Deleted: sha256:72d5586b07572feeff2193c17a81d9c98423da9d2afa74476c8b124becf66bfc
Deleted: sha256:c4d24abe776d3e83afb1a11dea164f043369599a6175582b647937ecb4a70568
Deleted: sha256:3321b6513213cb2d157bf67f79536a6c54d1c26e17c1de63760afd1bcbae081b
Deleted: sha256:608f3a074261105f129d707e4d9ad3d41b5baa94887f092b7c2857f7274a2fce
xadlien@swift3x:~$ time sudo docker pull 172.16.196.129:5000/redis
Using default tag: latest
latest: Pulling from redis
c229119241af: Pull complete
bed41eb8190a: Pull complete
5e59eaa723f1: Pull complete
fd5ad7669819: Pull complete
566c064eef6e: Pull complete
20c7cfac25de: Pull complete
Digest: sha256:69a3ab2516b560690e37197b71bc61ba245aafe4525ebdece1d8a0bc5669e3e2
Status: Downloaded newer image for 172.16.196.129:5000/redis:latest
172.16.196.129:5000/redis:latest

real	0m1.054s
user	0m0.016s
sys	0m0.035s
That speed! We can do this with any image in the Docker Hub.
Final Thoughts
In a future post we will look at doing a Docker mirror with Docker Registry.